
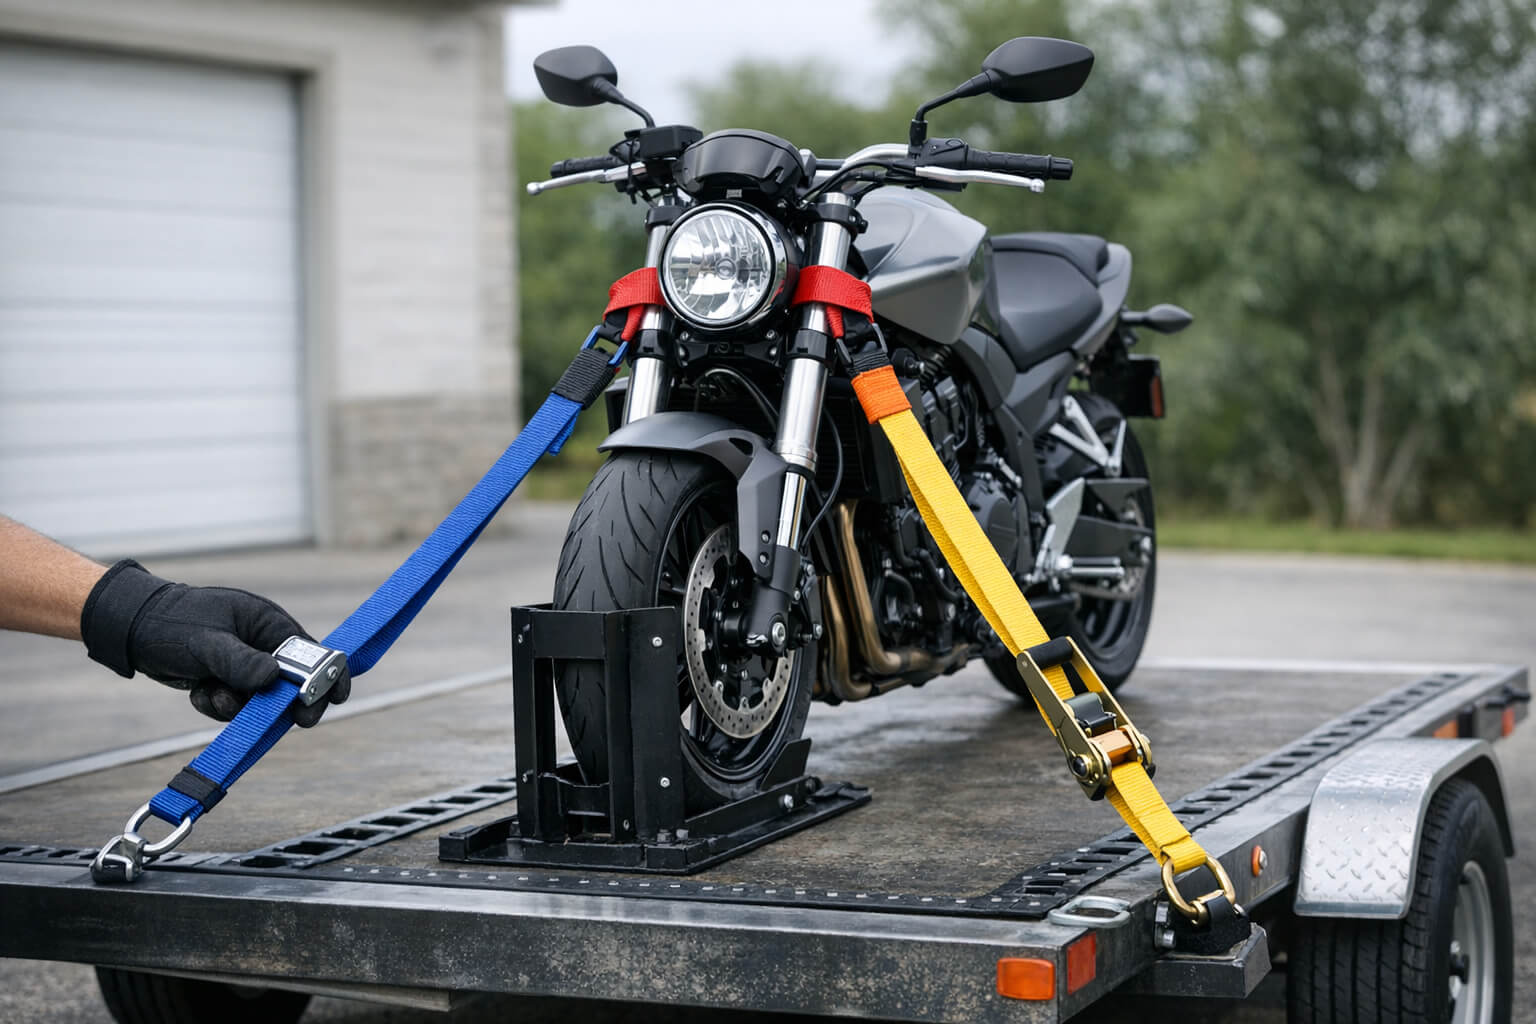
If you’re strapping a motorcycle to a trailer or flatbed, the cleanest way to avoid scratches and bent parts is to separate where you tension from what you touch. In practice, that usually means using soft ties on the bike to create safe attachment points, then using quality towing/transport straps to do the actual tightening to the truck or trailer. If you’re unsure you can secure the bike without contacting paint, pinching lines, or over-compressing the suspension, it’s worth calling Timber Towing and Recovery at (651) 318-0441 for motorcycle-specific towing, especially when you’re dealing with a breakdown on the roadside.
Quick guidance most riders can follow
Soft ties are there to protect the motorcycle. Straps are there to hold the motorcycle in place. Using both is how you keep metal hooks and rough webbing away from painted surfaces, cables, brake lines, and delicate controls while still getting a secure hold.
A dependable baseline is a four-point setup: two straps at the front doing most of the work, and two at the rear mainly preventing side-to-side movement. If you only do one thing “extra,” add soft ties to the front. Most avoidable damage happens at the first contact point up front: handlebars, fairings, or wiring that gets trapped under a strap.
What motorcycle “towing straps” and soft ties actually are
Transport straps (ratchet or cam-buckle)
Transport straps are webbing straps designed to tension and hold a load. For motorcycles, you’ll mostly see:
- Ratchet straps, which can generate a lot of tension with little effort. They’re strong and secure, but they can also crush what they’re attached to if you get heavy-handed.
- Cam-buckle straps, which tighten by pulling the webbing through a spring-loaded cam. They’re harder to overtighten, making them forgiving for lighter bikes and for people who don’t strap bikes down often.
Strength ratings matter, but not in the way many people think. You don’t need the highest-number strap you can find, you need a strap that’s in good condition, sized for the job, and paired with good attachment points and angles. A frayed strap or a bent hook is a bigger risk than “not enough rating.”
Soft ties (also called handlebar loops)
Soft ties are short loops of webbing, often with a reinforced stitched eye. You wrap them around a solid part of the motorcycle and use them as a protected “handle” for your strap hook. They help because they:
- Keep metal hooks off paint and anodized surfaces
- Spread load over a wider area than a thin hook
- Let you attach in tight areas without rubbing plastics or pinching hoses
Some soft ties include a sleeve or extra padding. That’s helpful, but the bigger win is simply creating a clean, non-marring connection point.
Pros and cons: straps vs soft ties (and why they’re not either/or)
Straps alone can work, but the margin for error is smaller. Hooks can swing into a tank or fairing, webbing can rub through a sharp edge over a long trip, and a strap can trap a cable or brake line if it’s routed carelessly.
Soft ties alone aren’t a securement system. They don’t tighten the bike to the deck, they just provide a safer interface. Think of them as the “adapter” that makes your strap setup motorcycle-friendly.
The combination is what most riders end up with after they’ve seen one ugly scuff on a fork tube or a kinked brake line. Soft ties reduce contact damage; straps provide the tension and stability.
Where to attach: safe anchor points on common motorcycles
The best attachment points are structural, relatively smooth, and clear of moving parts and lines. You’re trying to pull the bike down and slightly forward into its “parked” stance on the deck, not bend something into submission.
Front attachment points (where most of the holding happens)
Lower triple clamp or fork crown area
When you can access it, wrapping soft ties around a sturdy section near the triple clamp is stable and keeps tension off fragile controls. It also tends to keep the strap path away from switchgear and grips.
Handlebar area near the clamps
This can be fine on many bikes, especially standards and cruisers, but the details matter. You want to avoid anything that rotates, flexes, or houses wiring. Strapping at the grips, around mirrors, or over handguards is how parts get bent or cracked.
What to avoid up front
- Brake lines and ABS sensor wiring
- Throttle cables and clutch cables
- Fairings and windshields
- Turn signal stalks and mirrors
If you can’t route a strap without touching these, change your anchor point or add a soft tie to move the hook and webbing away from them.
Rear attachment points (mostly for stabilization)
Rear straps keep the bike from walking sideways. They usually don’t need to be as tight as the front.
Good rear options often include:
- Passenger footpeg brackets
- A sturdy subframe section (where accessible)
- Certain luggage rack mounts (if truly solid and not plastic)
Rear points to avoid:
- Exhaust pipes and mufflers
- Chain and sprocket area
- Rear brake line routing
- Thin plastic bodywork
If a rear strap is so tight it’s compressing the rear suspension significantly, you’re likely using the rear to do a job the front should be doing.
Special cases to think through
Sport bikes with clip-ons and tight bodywork
There may be limited safe space around bars and fairings. Triple clamp and fork-related anchor points are often safer than trying to strap around controls.
Cruisers with tall risers and accessories
Big bars make it tempting to strap anywhere. Avoid loading force into tall risers, clamps, or aftermarket add-ons that can rotate. Choose solid, central points.
ADV and dirt bikes with handguards
Handguards and plastics crack easily if they become a strap contact point. Route straps so they never “saw” across guards or shrouds.
How to rig the straps so the bike stays put without damage
A secure motorcycle doesn’t need brute force. It needs good geometry and clean routing.
Position the bike and plan your strap lines
Center the bike on the deck and keep the front wheel straight. If you have a wheel chock, use it. If you don’t, you can still secure the bike safely, but you need to pay more attention to strap angles and symmetry.
Before you tighten anything, look at where each strap will travel. If a strap will cross a sharp edge, rub a fairing, or touch a hot exhaust, reroute it now. A strap that looks “fine” in the driveway can shift and rub for 30 minutes on the highway.
Use soft ties to create protected attachment points
Wrap the soft tie around the selected anchor point so the stitched loop is accessible and not twisted. Your strap hook should connect to the soft tie loop, not to the motorcycle itself.
If the soft tie sits against something sharp, move it. Webbing can cut surprisingly fast on rough edges.
Choose angles that resist both tipping and sliding
Front straps usually work best when they pull:
- Downward (to keep the bike planted)
- Slightly forward (to keep the front wheel seated)
- Outward in a balanced way (to resist side movement)
Rear straps can be straighter and lighter in tension. Their job is to keep the rear from stepping out during bumps and turns.
Crossing straps can help with lateral stability in some setups, but it isn’t required if your anchor points and angles are solid. The real test is whether the bike stays centered without “walking” after bumps.
Tension the bike without crushing the suspension
Compressing the front suspension a bit is normal. Bottoming it out isn’t. Over-compression increases stress on seals and components and makes the bike more likely to shift when the suspension can’t absorb bumps.
Tighten each side gradually and evenly, alternating left and right so the bike stays upright and centered. Then do a short re-check after things settle. Webbing stretches slightly, soft ties seat into place, and the bike will “relax” into the straps.
A simple check: push the bike gently side to side. You shouldn’t be able to rock it far, and it shouldn’t clunk into a new position. If it moves a lot, you need better angles or more stabilization, not necessarily more torque.
Ratchet vs cam-buckle straps for motorcycles
Ratchets are popular because they feel secure. The trade-off is that they make it easy to overdo it, especially if you’re strapping to handlebars or anything that can flex. They’re a good choice when you have solid anchor points, a heavier bike, or a longer trip, and you’re disciplined about tension.
Cam-buckles are easier to live with for many riders because you tighten by hand force, which naturally limits how much you can compress the bike. They’re also quick to adjust and less likely to encourage “one more click” that bends something.
A good approach is using the strap type you can tension smoothly and predictably. A well-routed cam-buckle strap can be safer than a ratchet strap used aggressively.
Hook, soft-hook, and hardware details that prevent scratches
Bare metal hooks near painted surfaces are a common damage source. Even if the hook never touches the bike at rest, bumps can make it swing.
Safer options include:
- Hooking to the trailer’s D-ring or anchor point and keeping the hook far from the bike
- Using soft ties so the hook connects to webbing, not metal or painted parts
- Choosing straps with coated hooks, while still ensuring the coating isn’t cracked or missing
Also look at the trailer or flatbed anchor points. Sharp edges can cut strap fibers. If you see rough metal, consider a different tie-down location or add abrasion protection.
Common mistakes that cause damage (and how to avoid them)
Damage usually comes from one of a few patterns:
- Strapping over controls or cables. If you can’t see every line the strap passes near, re-route it.
- Letting webbing rub on fairings or sharp edges. Movement plus time equals wear.
- Over-tightening the front. If the forks are deeply compressed and the bike looks “squatted,” back it off and rely on better angles and rear stabilization.
- Skipping rear stabilization. The front can be perfect and the bike can still walk sideways if the rear is free.
- Using questionable gear. Old straps, sun-damaged webbing, bent hooks, or torn stitching are a gamble.
If your setup looks clean, symmetrical, and free of contact points that can rub, you’re most of the way there.
Roadside reality: when improvising is a bad idea
Trying to “tow” a motorcycle with makeshift straps, a buddy’s car, or a rope introduces hazards that don’t show up in calm driveway loading. Steering can lock, attachment points can fail, and traffic leaves little room for correction. If the bike is stuck in an unsafe spot, has wheel or suspension damage, or you don’t have proper tie-down gear, motorcycle-specific towing is usually the safer path.
A simple checklist for a safer motorcycle tie-down
- Two soft ties (four gives you more options)
- Two quality front straps plus two rear stabilizer straps
- Clean anchor points on the trailer/bed (D-rings, E-track, or sturdy loops)
- A quick re-check after the first few miles or after settling
- A plan that keeps hooks and webbing off paint, plastics, and lines
Summary
Soft ties and towing straps solve different problems: soft ties protect the motorcycle and give you safe connection points, while straps provide the tension and stability that keep the bike planted during transport. Using soft ties up front, choosing solid anchor points, keeping strap paths clear of lines and bodywork, and tightening evenly without crushing the suspension will prevent most of the damage riders see during towing or transport. If you’re dealing with a breakdown or you’re not confident you can secure the bike without risking damage, Timber Towing and Recovery can help with motorcycle towing and transport. You can reach them at (651) 318-0441 to get the bike moved safely without guesswork.


